You can achieve a perfectly braised chicken with crispy skin that is absolutely irresistible. In this blog post, I’ll guide you through my simple yet effective method that ensures your chicken is tender and full of flavor while its skin achieves that coveted crunch. By following my easy steps, you’ll transform your oven into a culinary powerhouse, creating a delightful dish that will impress family and friends. Let’s get started on this delicious cooking journey!
Understanding Braising
Your journey into the world of braising begins with grasping the fundamentals of this cooking technique. Braising involves a two-step process that combines both wet and dry cooking methods, where food is first seared at a high temperature and then cooked slowly in a covered pot with moisture. This not only enhances flavors but also helps in achieving tender and juicy results, making you a master in preparing perfectly braised chicken with crispy skin.
What is Braising?
Understanding braising is key to elevating your cooking skills. It’s a method where meat, such as chicken, is browned in fat and then cooked slowly in a flavorful liquid, allowing the flavors to meld beautifully. The low and slow cooking process breaks down tough fibers, resulting in incredibly tender meat.
Benefits of Braising Chicken
There’s a range of advantages to braising chicken that can transform your meals. This technique not only ensures moist and tender meat but also allows for a deep infusion of flavor, enhancing the overall dish. Moreover, braising can be a time-efficient method, as you can prepare the ingredients and let the oven do the work while you attend to other tasks.
What sets braising apart is its ability to unlock rich flavors and create a delicious sauce that accompanies your chicken. This method is especially beneficial for tougher cuts of meat, which become fall-off-the-bone tender. You’ll find that braised chicken is a versatile dish that can be adapted with various spices, herbs, and liquids, ensuring each experience is uniquely satisfying. Whether it’s for a family dinner or a special occasion, braising offers an effortless way to impress your guests.
Key Factors for Perfect Braising
It’s necessary to consider several key factors to achieve perfectly braised chicken. First, ensure you have the right temperature, followed by the ideal cooking time. Additionally, use a heavy, lidded pot to retain moisture effectively. Finally, allow the chicken to rest after cooking for juiciness and flavor. Here are the key factors to focus on:
- Temperature
- Cooking Time
- Pot Type
- Resting Period
Perceiving these elements can significantly enhance your braising technique.
Choosing the Right Cut of Chicken
Any cut of chicken can be braised, but for the best results, I recommend opting for parts that have more connective tissue and fat, like thighs or drumsticks. These cuts remain tender and flavorful during the slow cooking process, ensuring a delicious outcome.
Importance of Seasoning
Assuming you want your braised chicken to have an impressive flavor profile, seasoning is vital. The right balance of spices and herbs enhances the chicken’s natural taste and prevents it from being bland.
For instance, a well-seasoned braise incorporates salt, freshly cracked pepper, and fragrant herbs. These ingredients not only boost flavor but also contribute to that beautiful crunchy skin. It’s generally advisable to season your chicken generously before braising, as this allows the flavors to penetrate the meat during the cooking process. Utilizing a marinade or dry rub beforehand can also elevate the taste, making your dish remarkably more enjoyable. Keeping in mind how flavor interacts during cooking will help you create a standout meal.
Preparing Your Ingredients
Unlike cooking methods that require minimal prep, braising chicken in the oven benefits greatly from a little foresight. Ensuring you have all your ingredients ready and prepared not only streamlines the process but enhances the flavor of your dish. I recommend gathering everything you need before you start cooking to create a satisfying and efficient culinary experience.
Essential Ingredients for Braising
Essential to braising chicken are a few key ingredients, including your choice of chicken, which I prefer bone-in, skin-on for the best taste. You’ll also want some quality broth or stock, wine for depth of flavor, and an assortment of aromatic herbs and spices. Adding vegetables like onions, carrots, and celery creates a lovely base for your dish.
Prepping Vegetables and Aromatics
Clearly, the preparation of your vegetables and aromatics is imperative for a harmonious braise. I like to dice onions, chop carrots, and slice garlic, ensuring everything is uniform in size to facilitate even cooking. Don’t overlook the use of fresh herbs; they impart an aromatic quality that elevates the overall experience of your meal.
A well-prepped vegetable and aromatic medley can make all the difference in your braised chicken. Start by washing all the vegetables thoroughly to remove any dirt. Next, slice your aromatics—like onions and garlic—into small, even pieces to ensure they cook down nicely and release their flavors. By chopping carrots and other root vegetables into bite-sized pieces, you allow for even braising alongside the chicken. This not only enhances the dish’s flavor profile but also contributes to a more visually appealing final plate. Incorporating fresh herbs like thyme or rosemary will add an aromatic punch that transforms the ordinary into the extraordinary.
How-to Braise Chicken
Keep your chicken juicy and flavorful by mastering the art of braising. This technique allows you to infuse your chicken with rich flavors while keeping the skin crispy, making it a perfect choice for a main course. Let’s explore the step-by-step process that will elevate your chicken dish to a whole new level.
Step-by-Step Braising Instructions
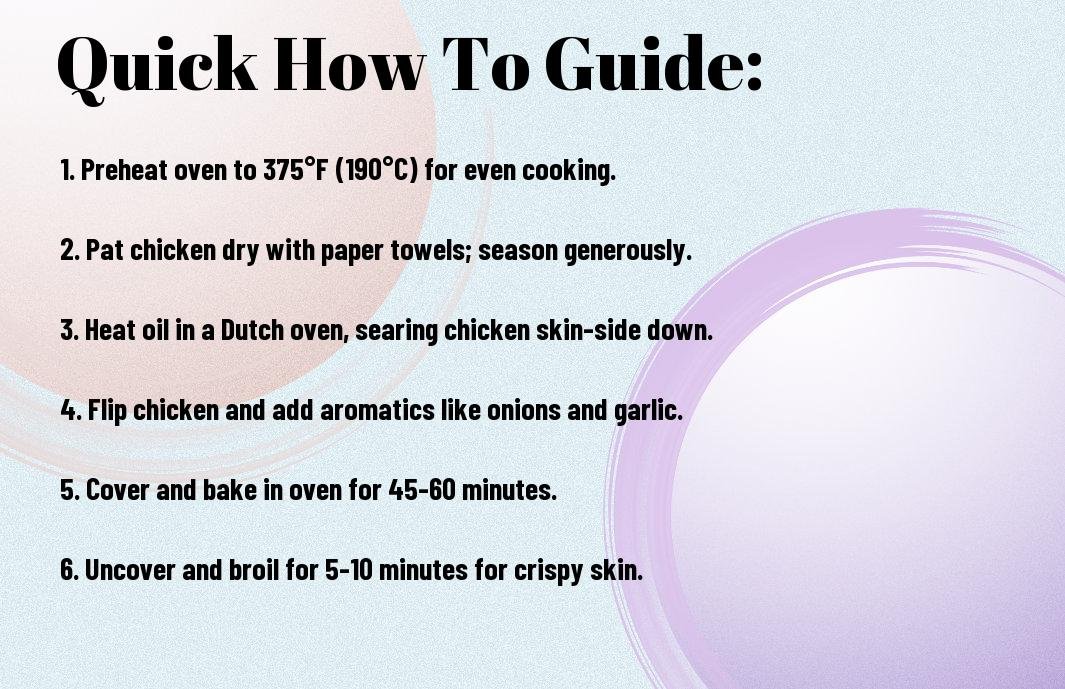
Assuming you have all your ingredients ready, follow this simple guide for perfectly braised chicken:
| Step | Instructions |
| 1 | Preheat your oven to 350°F (175°C). |
| 2 | Season your chicken with salt and pepper. |
| 3 | Heat oil in a large, oven-safe pot or Dutch oven. |
| 4 | Sear the chicken skin-side down until golden brown. |
| 5 | Add aromatics (onions, garlic, herbs) and sear briefly. |
| 6 | Pour in the braising liquid (stock, wine, or both). |
| 7 | Cover and transfer to the oven for 1-1.5 hours. |
| 8 | Remove the cover for the last 20 minutes to crisp the skin. |
Tips for Achieving Crispy Skin
With a little extra attention, you can achieve that irresistible crispy skin on your braised chicken. Here are some helpful tips:
- Make sure to pat your chicken dry before cooking.
- Use a high smoke-point oil for better crisping.
- Don’t overcrowd the pan to allow for even cooking.
- Turn the oven’s broiler on for the last few minutes for extra crunch.
This technique will give you the ultimate crispy texture for your chicken skin!
Howto ensure you get the best crispy skin involves focusing on a few key actions. Here are some additional reminders:
- Opt for bone-in and skin-on chicken pieces for the best results.
- Cook the chicken skin-side down first to promote browning.
- Use high-temperature methods wisely for finishing.
This will help you to achieve that perfect balance of flavor and texture in your dish!
Cooking Techniques and Tips
Despite common misconceptions, achieving perfectly braised chicken with crispy skin is entirely feasible with the right techniques. Here are some crucial tips to enhance your process:
- Start with a good quality cut of chicken.
- Always season your chicken generously.
- Allow for ample resting time post-cooking.
- Use a combination of liquid for moisture and flavor.
This will ensure that your dish not only tastes amazing but also looks appealing.
Searing for Flavor
Even though it may seem like an extra step, searing your chicken before braising is key. It creates a beautiful golden-brown crust and enhances the overall flavor profile. I recommend heating oil until it’s hot and shimmering, then placing the chicken skin-side down to achieve that crispy finish.
Oven Temperature and Timing
One of the most important aspects of braising chicken is understanding the right temperature and timing. This can dramatically affect the cooking process, resulting in tender, moist meat or a dry outcome. Here’s a breakdown:
| Oven Temperature (°F) | Cooking Time (Hours) |
|---|---|
| 325 | 1.5 – 2 |
| 350 | 1 – 1.5 |
You can adjust the oven temperature based on your schedule and desired results. Higher temperatures may yield shorter cooking times, but they increase the risk of dry chicken. Ensure the chicken is fully cooked by checking the internal temperature, ideally achieving at least 165°F for safety.
More on Oven Temperature and Timing
Oven cooking needs careful attention to both temperature and timing for achieving the best results. I often advise these guidelines:
| Tip | Details |
|---|---|
| Preheat your oven | Always start with a preheated oven to ensure even cooking. |
| Monitor closely | Check the chicken periodically to prevent overcooking. |
By being mindful of temperature and timing, I can create a beautifully braised meal with crispy skin that you will love. Your chicken will be a hit at the dinner table!
Serving Suggestions
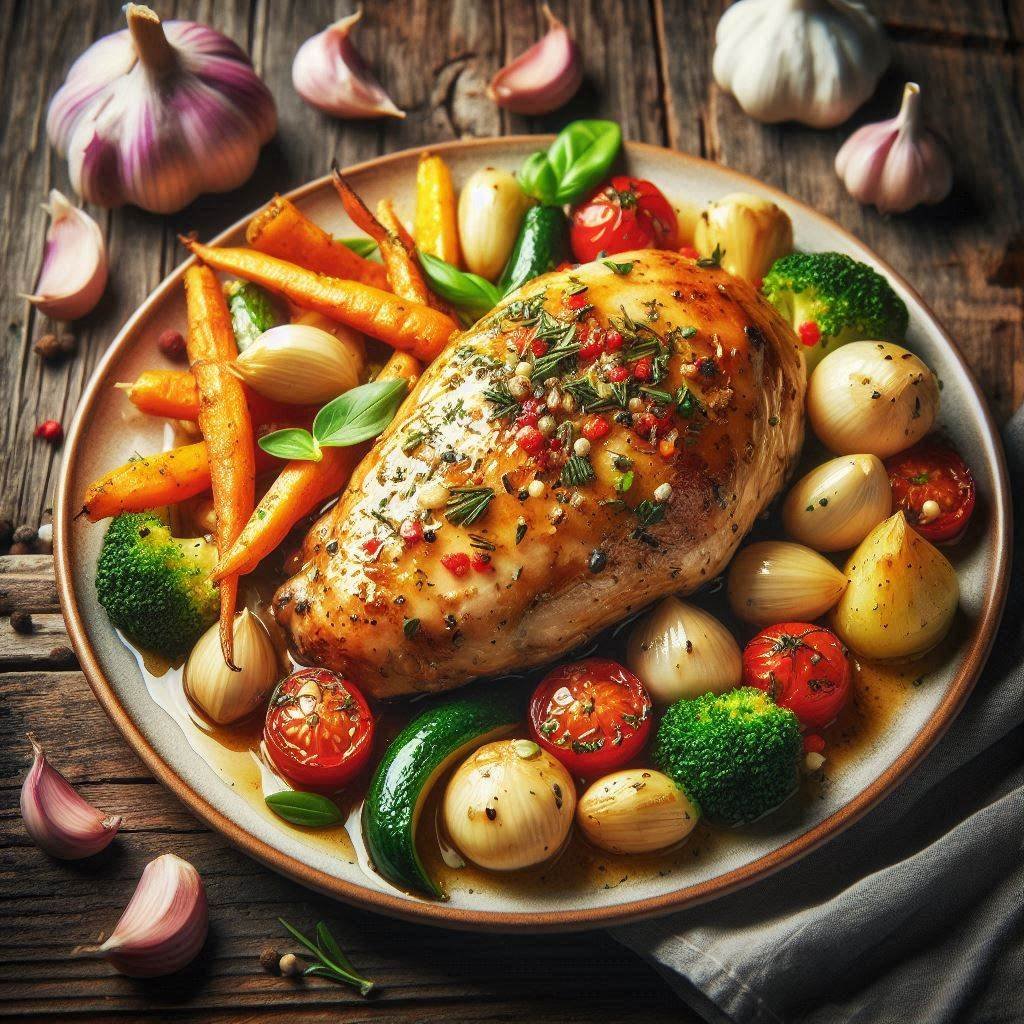
For a delightful dining experience, serve your braised chicken with complementary sides. Consider offering a variety of textures and flavors to fully enhance the meal. A fresh salad, creamy mashed potatoes, or sautéed seasonal vegetables can round out the dish beautifully.
Pairing with Sides
Clearly, the right sides can elevate your braised chicken dish. I suggest potatoes au gratin, roasted root vegetables, or a zesty quinoa salad. These options not only add depth to the meal but also create a harmonious balance on the plate. The combination of flavors will leave your guests satisfied.
Presentation Tips
Suggestions for presenting your braised chicken involve simple yet effective techniques. I recommend arranging the chicken on a large platter and garnishing it with fresh herbs, like rosemary or parsley, for a pop of color. You might also drizzle some of the braising liquid over the top for a glossy finish. The inclusion of side dishes in matching bowls can add elegance.
- Use a large platter for a beautiful presentation of braised chicken.
- Garnish with fresh herbs for color.
- Drizzle braising liquid for shine and flavor.
With each of these tips, I aim to create a visually appealing meal that is sure to impress. The details you include will transform your dish into a centerpiece.
- Arrange the chicken in an appealing manner.
- Consider lighting when serving for best effect.
- Use colorful side dishes to draw the eye.
With thoughtful presentation, your braised chicken will not only taste divine but also visually enchant your diners. The eye-catching display plays a significant role in the dining experience.
Final Words
Conclusively, I find that perfectly braising chicken in the oven for crispy skin is a rewarding process that elevates your culinary skills. By following the right techniques—seasoning well, searing properly, and managing the cooking time and temperature—you can achieve deliciously tender meat with the perfect crunch. With practice, you’ll refine your approach to ensure every bite is enjoyable. So, gather your ingredients, and enjoy the delightful results of your efforts!